Showing posts with label cruelty free makeup brushes. Show all posts

Thursday, February 20, 2014

Makeup Brushes Every Girl Should Own


Excuse me while I geek out for a moment, but nothing excites us quite like the thrill of brand new makeup brushes. Pristinely clean and those soft bristles…swoon. You may or may not share our same enthusiasm for beauty tools, but if you’re in the market for makeup brushes it’s important to know what you need. The options are plentiful, but there’s something out there crafted for exactly what you want to do. Let me help you find that. 


Flat Concealer Brush: The flat rounded tip makes blending around the contours of the face a breeze. Use one side to apply concealer to under-eye circles, then flip it over and use the clean side to blend.

Personal pick: Younique Concealer Brush - totally non-porous and non-absorptive to ensure a light application and will help your concealer last longer. My own very own "magic" brush!


Precision Concealer Brush: This concealer brush is smaller and comes to a point allowing for more precise application. Use it to conceal blemishes and littler imperfections and to clean up the lines after applying a bold lip color.
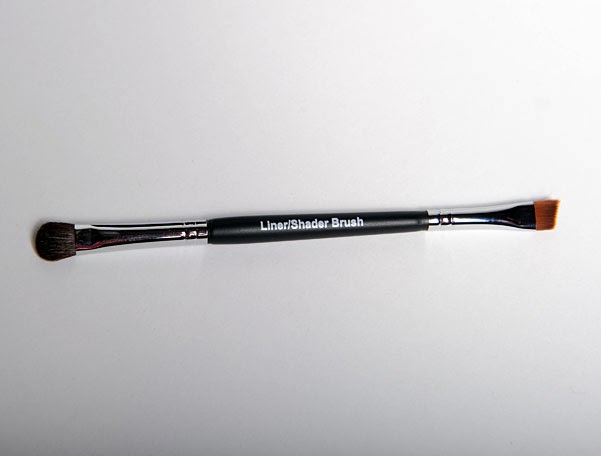
Personal pick: Younique Liner/Shader Brush - the shader end blends soft areas of mineral pigments and moves fluidly and easily for a diffused and blended finish. Who doesn't love a twofer?

Eyeliner/brow Brush: A small angled natural or synthetic brush. It's multi-purpose as it can be used on your lashline for eyeliner and your brow to fill it in. Plus it is the most user-friendly of the eyeliner brushes due to its easy-to-maneuver slanted angle.


Personal pick: Younique Liner/Shader Brush - the liner brush end creates smooth and even lines. Use wet with mineral shadows for a creamy liner "paste" that will define the eyes.


Powder Brush: Loosely packed bristles make for one big, fluffy brush with a rounded shape.Use it with loose or pressed powders, just tap off the excess before using sweeping motions to brush it across the face.

Personal pick: Powder Puff Brush - they are made with real capra animal hair and extremely soft, oh so perfect for applying dry loose powders onto the skin!


Blush Brush: A more compact powder brush that can be used to apply cheek color. Smile to locate the apples of the cheek, and use short strokes to dust powder out toward the hairline.
Personal pick: Younique Blusher Brush - it provides precise placement of color because of its deliberate slanted shape and absorbent qualities, resulting in a truly sculpted appearance!

Eye Shadow Brush: A small, stiff, flat natural brush you need to apply allover eye shadow
color. It will give your lids a smooth finish and more intense pigment than a fluffier brush would. Sweep shadow over the lids from the inside of the eye, outwards.

Personal pick: Deluxe Brush - uniformly covers the whole lid for a quick, even, strong application of color. All Younique makeup brush have an inner high-quality copper ferrule which means it won't rust when you use them wet or dry! 


Crease Brush: Blends and contours in the crease and corners of the eye. This domed bristle brush picks up eye color and sweeps it onto the eyelid to create bold definition. Great for smudging shadow into the lash line for a smoky effect. 

Personal pick: Younique Crease Brush - I use just the tip to apply color, sweep back and forth in the upper crease or around the eyes for precise color. My essential brush for creating a perfect smoky eyes!

Thursday, January 16, 2014

7 Eyeshadow Mistakes to Avoid


1. Matching Your Eyeshadow to Your Eye Color
The common rule of thumb is that eye colors look best with eyeshadow shades on the opposite side of the color wheel. For example, green eyes look gorgeous with burgundy shadow, since red and green are complementary colors. If you do want to a try a shade that’s similar to your eye color, choose a muted one that won’t overshadow the iris. [Check out this simple chart for complementary colors]

2. Forgetting to Blend
Blending different colors — one or two on the lid and another on the brow bone — creates a gorgeous finish. But if there is a harsh line between each color, it looks sloppy and undone. Make sure to blend each shade into the next with a shader brush.

3. Using Applicators that Come with the Shadow
Most eyeshadows come with handy mini applicators, making it easy to apply on the go. However, for a truly blended finish, you should use a makeup brush. A sponge tip applicator provides a lot of pigment at once while a brush allows you to gradually add product and blend as you go. [Using makeup brushes also = more sanitary.]

4. Applying Too Much Below the Eye
Be careful to dab shadow only on the lower lash line and not any farther down. Any additional product drags down the look and makes the eye appear tired.

5. Applying Eyeshadow After Concealer
Always apply your eyeshadow before your under eye concealer. If not, the shadow will fall all over the eye area and undo all your hard work. When dabbing concealer on the under eyes, place it just below the lower lash line.

6. Using Shimmery Shadows on Aging Lids
Because of their light-reflecting properties, frosty shadows draw attention to wrinkles and crepey lids. Leave the sparkly shades to twentysomethings and choose more flattering matte or satin finish products instead.

7. Skipping Liner and Mascara
Eyeshadow doesn’t do it all; the eye also needs some contrast. Dark mascara and eyeliner frame the shape (creating an outline) while the shadow brightens and opens up the eye.

Tuesday, January 14, 2014

Quick Roots Fix


Eek! Just noticed your grays are showing and you don't have time to get a touch up? No problem! Here's a quick cover up trick:

You'll need:

  • Eye shadow (or powder concealer) close to your hair color. (I find a loose powder pigment works best, but a packed color works too!)
  • Makeup Brush (I recommend a tightly packed brush)
  • Hairspray 
Directions:
Load your brush up with color, apply it on your roots using a tapping motion (not strokes -- think jackhammer!). When the grays are gone, simply top it off with hairspray to keep it in place all day - VOILA!

Monday, January 13, 2014

Makeup Tutorial


Recreate this gorgeous and soft look using Younique mineral pigment powders. (100% natural, chemical-free, mineral-based pigment powders, free of talc, oils, preservatives, perfumes, synthetic dyes, and parabens.)

1. Daring, applied with the deluxe eye brush 
2. Infatuated, applied with the deluxe eye brush
3. Corrupted (wet), applied with the liner brush
4. Blend line from step 3 for a softer look, using the shader brush
5. Playful, applied with the crease brush
6. Precision eyeliner in Perfect (Tips on how to keep your waterline makeup in place all day.)
7. Curious, applied with the deluxe eye brush 
8. Innocent, applied with the deluxe eye brush 
9. Top off with 3D Fiber Lashes!

Smile, beautiful :)


(Purchase all 3 cruelty-free, high quality makeup brushes  here, and a set of 4 100% natural mineral eye pigments here)