Friday, February 21, 2014

Do's and Don'ts of Liquid Eyeliner

Liquid liner is THE makeup essential. The good news: one sweep along the lash line and your makeup look is nearly complete. The not-so-good news: it’s a littttttle tricky. And for that reason, we’re breaking down some critical do’s and don’ts.
DO pair black liquid liner with a red lip, flawless skin and nothing else for instant and effortless beauty.
DON’T pair a strong and precise liquid liner look with a heavy smoky eye. The two effects are too competitive with each other.
DO apply liquid liner THISCLOSE to the lash line in small dashes. Go over the dashed line again in a fluid motion to smooth the line, then build up the line if you want more impact or are creating a specific shape (hello, cateye).
DON’T keep piling on more liner to mask imperfections. Instead, if you mess up, clean and perfect the line using a cotton swab dipped in makeup remover.
DO follow the curve from the lower lashline when extending liner up and out to create a cat-eye.
DON’T go out imbalanced. Check that your eyes are symmetrical. Note: one side will inevitably be easier than the other. Work to make the hard side look like the easy side.
DO choose a jet black liner for a classic look, chocolate brown or slate grey for a soft look and a bright color for a seasonal/trendy look.
DON’T use a bright color liquid unless the rest of the face is neutral.
DO use a small synthetic brush with concealer on it to edge out the perfect eyeliner shape and detail a creative shape.
DON’T run liquid liner on or along the lower lashline or in the tearline. Use pencil liner for that.
DO layer on the mascara to really pop the eye as a final step after liquid liner.
DON’T apply other eye makeup until the liquid liner has completely dried.

Brown Eye Makeup Tutorial

Brown is one of those colors that, for some reason or other, usually gets overlooked in the beauty world. Sure, it’s versatile and a great daytime hue, but it’s certainly not considered the most exciting – especially when we have colors like radiant orchid, navy and burgundy to play around with. But perhaps there’s more to brown than we know. Perhaps brown has the hidden potential to actually be…exciting? This tutorial will teach you to create a dramatic, seductive, double take-worthy brown eye makeup look – the opposite of “boring” in every way. The result? Let’s just say we’re never putting baby in a corner ever again.


Shimmery Base: Wash the eyelid with a soft, shimmery golden hue like Moodstruck Minerals Concealer in Foxy (this versatile powder is the same one used to warm up your face in the final step).

Add Dimension: Apply a cool brown eye shadow with a hint of shimmer (try Moodstruck Minerals Pigment Powder in Confident) along your socket to add a touch of smokiness. To create even more dimension, add a warm champagne shimmer like 
Moodstruck Minerals Pigment Powder in Heart Broken in the inner corner of your eyes and in the center of your lid. Blend with an eye shadow brush.

Liner + Mascara: Sweep a black eyeliner as close to the lash line as possible, then swipe on the best mascara 3D Fiber Lashes for full, look-at-me lashes.

For the final touch, dust on a warm, glowy powder like 
Moodstruck Minerals Concealer in Foxy across your cheeks, down your nose and across your forehead. You glow, girl!

Thursday, February 20, 2014

Quick Tip: Tame Unruly Eyebrows


Spritz an old toothbrush or a clean mascara wand with hairspray, then brush brows and style them as desired. Even the most hard to tame brows will fall in line with this trick.

Makeup Brushes Every Girl Should Own


Excuse me while I geek out for a moment, but nothing excites us quite like the thrill of brand new makeup brushes. Pristinely clean and those soft bristles…swoon. You may or may not share our same enthusiasm for beauty tools, but if you’re in the market for makeup brushes it’s important to know what you need. The options are plentiful, but there’s something out there crafted for exactly what you want to do. Let me help you find that. 


Flat Concealer Brush: The flat rounded tip makes blending around the contours of the face a breeze. Use one side to apply concealer to under-eye circles, then flip it over and use the clean side to blend.

Personal pick: Younique Concealer Brush - totally non-porous and non-absorptive to ensure a light application and will help your concealer last longer. My own very own "magic" brush!


Precision Concealer Brush: This concealer brush is smaller and comes to a point allowing for more precise application. Use it to conceal blemishes and littler imperfections and to clean up the lines after applying a bold lip color.

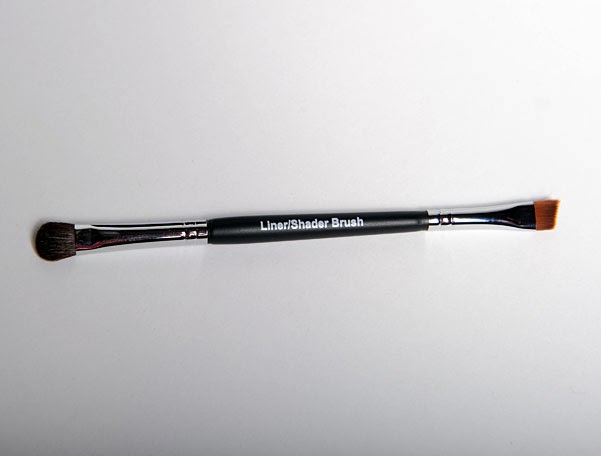
Personal pick: Younique Liner/Shader Brush - the shader end blends soft areas of mineral pigments and moves fluidly and easily for a diffused and blended finish. Who doesn't love a twofer?

Eyeliner/brow Brush: A small angled natural or synthetic brush. It's multi-purpose as it can be used on your lashline for eyeliner and your brow to fill it in. Plus it is the most user-friendly of the eyeliner brushes due to its easy-to-maneuver slanted angle.


Personal pick: Younique Liner/Shader Brush - the liner brush end creates smooth and even lines. Use wet with mineral shadows for a creamy liner "paste" that will define the eyes.


Powder Brush: Loosely packed bristles make for one big, fluffy brush with a rounded shape.Use it with loose or pressed powders, just tap off the excess before using sweeping motions to brush it across the face.

Personal pick: Powder Puff Brush - they are made with real capra animal hair and extremely soft, oh so perfect for applying dry loose powders onto the skin!


Blush Brush: A more compact powder brush that can be used to apply cheek color. Smile to locate the apples of the cheek, and use short strokes to dust powder out toward the hairline.
Personal pick: Younique Blusher Brush - it provides precise placement of color because of its deliberate slanted shape and absorbent qualities, resulting in a truly sculpted appearance!

Eye Shadow Brush: A small, stiff, flat natural brush you need to apply allover eye shadow
color. It will give your lids a smooth finish and more intense pigment than a fluffier brush would. Sweep shadow over the lids from the inside of the eye, outwards.

Personal pick: Deluxe Brush - uniformly covers the whole lid for a quick, even, strong application of color. All Younique makeup brush have an inner high-quality copper ferrule which means it won't rust when you use them wet or dry! 


Crease Brush: Blends and contours in the crease and corners of the eye. This domed bristle brush picks up eye color and sweeps it onto the eyelid to create bold definition. Great for smudging shadow into the lash line for a smoky effect. 

Personal pick: Younique Crease Brush - I use just the tip to apply color, sweep back and forth in the upper crease or around the eyes for precise color. My essential brush for creating a perfect smoky eyes!

Wednesday, February 19, 2014

Beauty Wonders of Baking Soda

Baking soda, how women would love thee if they only knew all you can do for them. In case you didn't know, this white powder is a naturally occurring component of the mineral Natron. It can be found in countless mineral springs and it used to be called aerated salt, like a few hundred years ago. Humans have been harvesting and using it for a long time. In fact, its healing and detoxing properties are one reason why baths in mineral springs were popular back in the day and why spas literally sprung up around them for the rich and well-heeled.

These days, you don't have to travel to Switzerland to get the skin and beauty benefits of trace amounts of the stuff in a natural mineral spring—you can just go to the grocery store and buy a box. And you should! Because baking soda will transform your beauty life, possibly your skin and definitely your beauty budget. You can toss away so many masks and expensive bath salts, and so many other prettily packaged, costly beauty products.


The Great Exfoliator
How many products on the market claim to exfoliate your skin? From little beads in body wash to face wash to masks, they all say your skin will be renewed. After you use baking soda to exfoliate, you'll understand all other claims are overblown. Your skin will feel tight, your pores will be visibly smaller, and your skin will feel like a baby's, promise. Just mix baking soda and water until a paste forms. Gently rub on your skin in a circular motion and rinse. 


Anti-Acne Mask
Instead of scrubbing to exfoliate. Apply the paste you've made as a mask. Let sit for 10 minutes. Baking soda will draw out impurities, and even helps remove blackheads. Once per week will rid your skin of common breakouts. Trust. 


Tooth Whitening
Strips and pastes at the drugstore to whiten teeth are expensive. And forget about getting it done at the dentist, you don't want to look like one of those creepy TV hosts whose teeth look like they're electric. You dip your damp toothbrush directly into the powder or sprinkle some on top of your toothpaste. Scrub stains away. 


Dry Shampoo
Granted, if you have dark hair, this might be a tough sell. But for blondes and light brunettes, no need to spend money on dry shampoo when you're in between washing. A mix of baby powder and baking soda sprinkled on your brush before you pull it through your hair will have that extra oil and grease absorbed in no time. 


Product Buildup
Add baking soda to your shampoo before you shampoo as normal. You'll be getting rid of all that product buildup. Perfect after your hair has done bridesmaid duty under a helmet of hair spray.


Relieve Sunburn Itching and Irritation

Just soak a washcloth in cold water that's been infused with baking soda and press it on your burn. Relief is at hand. A lukewarm bath with half a cup of baking soda is one way to relieve skin that's been burned in more than one place. It happens.


Get Healthy Nails and Cuticles
If you've got a nail brush or an old toothbrush laying around and a box of baking soda, you've also got the potential for great nails and cuticles. Rub the brush (dipped in baking soda) on your nails for a thorough clean. Its natural antibacterial properties also treat nail fungus. Just apply a baking soda and water paste, leave on for ten minutes twice per day until the fungus is gone.


Deodorant
Because of its ability to absorb oil, smells, cleanse and fight bacteria, it's no wonder baking soda can also be used as a deodorant. How to apply? Dip a kabuki brush in the powder. If you want it to smell nice, just add a drop of your favorite essential oil.

Tuesday, February 18, 2014

Office to a Night Out Look in Minutes

How many of us really have hours to do make up? I bet majority will not have the time but we all do not want to miss catching up with friends over dinner or go dancing after work. So I thought why not share with you girls my neat little trick to convert your office make up to party make up in minutes! Let's get started.

Things you need in your office bag:


Assuming you already have the basics (Brilliant Daily Moisturizing Gel, BB Flawless Complexion Enhancer or foundation, whatever you usually like to wear at work) applied in the morning, we will build and enhance the eyes and lips perfect for night time in just 15 minutes!


Step 1- Use blotting paper to remove excess oils that developed on the face followed by a quick touch up from your favorite compact. Use of blotting paper helps you avoid a caked up look.
Step 2- Using 
Moodstruck Minerals Pigment Powder, use it as an eyeliner and tight line your eyes. Make an arc in the outer corner of your eyes as shown in the picture
Step 3- Still using Moodstruck Minerals Pigment Powder, take a little bit of pigment in your blending brush and start smudging the outer corner of your eyes.
Step 4- Curl your lashes and add
3D Fiber Lashes (see lashes amazingly transformed!).
Step 5- Apply lip liner and finish off with 
Lucrative Lip Gloss in Lethal. Lip liner prevents lip gloss from bleeding.

The whole process shouldn't take you more than 15 minutes. The trick is to practice so that you can carry all the products you need in your office bag, you'll be a master of it in no time!

How to Make Your Hair Color Last Longer

Frequent salon visits are expensive and at-home touch-ups every four weeks are time consuming. What's a girl to do? Fortunately for those of us who weren't born with our ideal hair color, there are ways to keep our tresses enhanced and color-rich that can save us time and money. With just a few dye-job hacks you can keep your color vibrant and your hair beautiful for longer than you're used to. Ready? Good, let's get started on your lesson. 

Get the Right Color
When it comes to lasting color, you're better off being discerning about which color you choose. Going from blonde to raven can be a fun switch up, for example, but a color so far from your own is likely to require more frequent maintenance. Plus, the fading will be obvious. Choose a color as close to your natural shade as possible instead. When it starts to fade, it will be less noticeable. Red is the color most prone to fading because the molecules are larger than other colors and less stable.

Time it Right
Did you know that the natural oils your scalp produces help strands hang on to color? That's why most instructions in at-home kits say to dye "unwashed" hair. So avoid the shampoo at least a couple of days before you dye. Also, try to avoid washing your locks for a couple of days after you dye. You'll be giving your hair a chance to completely absorb color. The better and more locked in it is at the start, the better it will look over time.

Deep Condition and Glaze
Deep conditioning is always a good idea, whether you dye your hair or not. It helps hair stay healthy, soft and more absorbent. A deep conditioning mask a week before coloring will give you great color and continuing a weekly treatment will help keep it that way. Hair glazes used to be a salon-only treatment but now you can buy them at the drugstore. Applying a glaze is one way to protect your hair from environmental damage that fades color. 

Avoid Alcohol-Heavy Products
You may have figured out by now that the name of the no-fade game is keeping hair healthy, absorbent and hydrated. Dried out hair loses color fast and its dull appearance makes what color is left look sad and tired. Before you apply any product like hairspray or gel, look at the label. If alcohol is listed within the top five ingredients, skip it. Alcohol dries out hair like nobody's business. 

Pick the Right Shampoo and Conditioner
Shampoos and conditioners that claim to protect color-treated hair aren't just an ad gimmick. They'll help prevent fading, unlike other hair cleansing products. Look for those that are made for your shade and use them if you can. Definitely avoid using a "clarifying" shampoo right before or after your hair is dyed. 

Utilize Shower Know-How
The sun, drying products and heat-styling are definitely to blame for fading color but there's usually a bigger culprit: just plain water. When you shower and how you shower makes a difference. Keep your hair out of the direct line of water your shower head emits, unless you're rinsing. Hot water dries out hair, making it more porous and more prone to color being washed away. So when you're rinsing, take the temp down to lukewarm or even cold, if you can't handle it. The less you wash your hair with shampoo (even color-protecting shampoos), the more color you're keeping on your strands. Invest in dry shampoo to use in between washes and consider wearing a shower cap on days you're not washing.